ASUS F3S power jack replacement
There was a beautiful sunny morning when to the service came a laptop ASUS F3S with a broken power jack.

For replacing the power jack, we need to disassemble the laptop, remove the motherboard, remove the broken power jack and mount the new power jack.
So we begin with removing the battery and power source.

Next we remove the covers by removing the screws assigned on the picture.

Next we need to remove the cooler and optical drive. We gonna use the same picture to assign and the other screws that need to be removed from the bottom.

After removing all these screws, we have this picture:

There are three screws that need to be removed so we can remove the cpu cooler. In this stem we also remove the WLAN card. First we detach the antennas, assigned with the red squares. After that we remove the screws assigned with the red circles.
Next we remove the two screws that are under the optical drive.

Next we need to remove the keyboard in the way shown on the picture:

After detaching the flat cable, we remove the assigned screw and detach the assigned cable. The assigned cable on the previous picture is the cable that connects the speakers to the motherboard, and don’t have to detach it at this point.

After removing the keyboard, we detach the touchpad flat cable.

Next we remove the plastic covers that cover the screen assembly brackets:

After removing the covers on the both sides, we have this:


There is one screw that connects the “ground” wire and flat cable on the both sides. We remove the cables and screws and after this we can remove the screen assembly, as assigned on the next picture:

There are three screws under screen assembly that need to be removed so we can remove the cover.

After removing the upper cover, we have this situation:

We need to remove the cables assigned with the red squares and the screws assigned with the red circles so we can remove the motherboard.
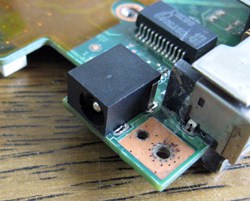
Here on the next picture we have the motherboard with the removed power jack. On the assigned place we need to mount the new power jack.

Here we have mounted the new power jack:

When all this is done, next thing that we need to do is to assemble the laptop, and to do this the procedure is the same as we show here, only backward.
4 Comments
Does this power jack have a determination?
Thank you very much for this! I am very grateful. It took a while, but this guide got me there in the end.
A tip for anybody trying this, print the pictures before you start, then use sticky tape to attach the screws to the pictures as you remove them.
i followed the pictures and get the Asus completely disassambled.
but now is there a scheme to recognize where all different screws have to go?
i read David later, is there a solution?
thank you
Hi Andrew, you cannot miss it too much with the screws. The smallest screws are under the optical drive. The middle screws (4mm) are for the outside covers, and all the others screws you can fill it with 6mm screws. Use the trial and error method. But i think that in your case there is no gonna be a problem to assemble the laptop.
Best Regards.